Friday, February 25, 2011

BHF Cable Release & Tripod Mount


I really like these old cameras. They are so simplistic, dependable, and cheap that it's hard not to enjoy using them. They shoot 6x6 film, and most will shoot fine with a 120 roll on the feed side, and a 620 spool on the takeup.

There are two things that I always wished I had with my BHF's in the field. One is a cable release, and the other a tripod mount. A while back I had seen on the web where people have added these refinements with some decent success, so I decided to give one of my the same upgrades.

Functionally everything works very well, just as it should. The aesthetics are nice too, although the cable release hole was a bit of a challenge to keep strait. I was using a cordless drill, and a workbench to make the holes needed. I believe the best would be to anchor the pieces on a drill press if you have one accessible.

To complete this project, a couple of items are needed from the hardware store. For the tripod mount I used a 1/4x20 acorn nut. I thought this would be the best since it is solid and I wouldn't have to worry about light leaks when it's not on a tripod. The next critical item is the threaded bushing that will anchor the cable release point. For this I was able to find a round aluminum threaded bushing that fits perfectly to my cable release. It took a few minutes combing through all the stuff they had trying them with my cable release in hand, but they had a perfect fitting bushing so I was happy. The next item from the hardware store was some epoxy to bond the new pieces to the camera body. Lastly, some flat black paint to spray over the epoxy'd acorn nut. Tools needed were simple also. I used a cordless drill and a couple different bits for the appropriate sized holes needed, and a phillips head screwdriver.


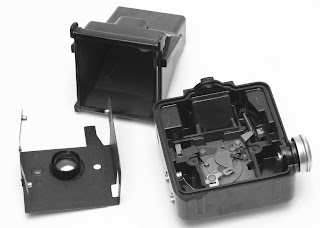
For this process I disassembled the camera as if you were cleaning the lens. That is to open the shells and remove the film box from the front of the camera including removal of the metal plate that covers the shutter assembly. Once disassembled, I was able to measure very carefully where to locate the cable release bushing. The best advice I can give is to measure the depth to the backside of the camera face, and also the depth to the plane just beneath the shutter cover plate. Once measured, transfer these measurements on top of the camera between the shutter button and the looking lens. This is where the hole will be drilled to drop the threaded cable release bushing into place and epoxy. It took a few steps to reach the final depth for this bushing. I was content to drill and measure with the cable release operation in order to get it correct without drilling too far. Once I verified that the cable release operated fully, I then epoxy'd the bushing into place. Before reassembly, to ensure the camera face was light tight, I stuffed some tight woven black felt under the shutter mechanism cover plate.


The tripod mount was very simple to install. With the shell open, I measured to the centerline and about 3/4 of an inch back from the lip. Here I drilled a hole large enough for the 1/4x20 acorn nut to seat well. Once situated, I carefully taped the acorn nut into position from the outside of the camera shell. This allowed me to apply the epoxy from the inside without it oozing all over my work surface. Once dried, a quick shot of flat black paint and everything was set. It should be noted that something will be required make this area light tight as there will be a round hole larger than the hex flats on the acorn nut. Even though the epoxy is dense, it does transmit light and would fog the film. The photos I took were actually prior to the painting for mine.


In all, I think I have about two hours in this project, and can hardly wait to try this BHF out using timed exposures, or just using the foolproof tripod mounting. Why go through all this when I have dozens of cameras that already have provisions like these??? Well, why not do it? I love my BHF cameras and consider them well worth a little upgrade to make them more usable.

Wednesday, February 23, 2011

Minolta XTsi & Plus-X 125


In my efforts to keep silver halide photography alive, I have been both encouraging and supportive of my two daughters shooting film. They have watched me develop film and make traditional wet prints for the past few years, and are fascinated by the processes. Both have learned to develop B&W film while I do nothing more than supervise. This has been very good for them as they have a real heartfelt desire to shoot film as a result of their seeing and learning.


Of course they need to have their own cameras to feel that sense of pride and ownership in their work. This nice 35mm Minolta now belongs to my 11 year old daughter. I bought this one brand new in 1996, and have really enjoyed owning it. It has several automatic exposure modes, but also has a full manual override mode, as well as auto or manual focus.


On our recent photo outing, my youngest daughter took this camera with her. Here are two photographs that she took and I really like them. With one at age 11, and the other at 17, they can go about their composures independent of my watching over them. Occasionally they will consult with dad about this or that, but for the most part they go about their work separate from my efforts. Of course I am partial to their work as their parent, but I was impressed with these two based on the compositions. They show me that she has been listening to my instructions and not just being a machine-gun-mad-clicker-of-the-shutter type photographer who is left with nothing but empty hopes something will work out in the end. The barn photograph is off in its exposure -trusting the onboard meter will do that- but the composition I really liked. The photograph of the corn stalks and cobs is to me very nice. This one may just be her first solo wet print.

Monday, February 21, 2011

Mamiya M645 & Ilford FP4+


I have two of these workhorses, and I love them both. These are very dependable professional medium format cameras that have stood the test of time and continue to perform well. I have an 80mm, 210mm, and 30mm fisheye lenses for the two bodies to share. Both have the bright fresnel screens and are easy to compose with. I have two WLF's and one eye level finder, and several back inserts to complete the package.

Recently my children and I went out looking for some interesting scenes and I took these two with me. This one setup with the 80mm f2.8 lens, and the other setup with the 30mm fisheye.

The weather was forecast to be quite pleasant in the mid 50's with overcast skies. What we got was something all together different. It rained while we were driving, but the rain did eventually give way to heavy overcast skies without the rain. The temperature never reached 45 I am sure, and the wind was very strong. In other words we were cold most of the day, but we did manage to get in a couple nice photographs. Below are two that I liked the most.


The film I used for these photographs was Ilford's FP4+ 125. I typically rate this film at 100 speed and get very predictable results from it. My normal two go-to developers for this film are Rodinal and D-76/ID11 depending on what I am trying to get out of the scene. I lean more towards the tamed grain that the solvent type developers like D-76/ID11 give, but sometimes the tones from acutance type developers like Rodinal fit the scene best.


Recently I was reading about adding a small amount of Rodinal to the solvent type developer Xtol in an effort to gain a little from both worlds. I tried that with this roll of film and wasn't so impressed that I will try this much more.

I like the zonal representation of this second image the most, but I like the composition of the first photo the best. As with most of my work, I post it like I shot it, so I didn't bother messing with the first one to see if I could get the tones where I wanted them using a computer. Sometimes I enjoy a little imperfection; it keeps me paying attention for the next time.


Mamiya M645 Waist Level Finder
Ilford FP4+ @ 100 EI

300ml Xtol
6ml Rodinal
Water to make 600ml
9.75 minutes 20c

Minolta XG1 & Efke KB100


What could be better than a free camera? This nice Minolta XG1 was free to me. One of my nieces and her husband were out thrift shopping and stumbled upon a sale that had two boxes of 'old camera stuff'. They popped the $2 and sent them to me. With the exception of this camera, the rest was old Super8 movie cameras.

When I got it the grunge was pretty bad and all over the body. After cleaning it up and putting in a fresh battery, I noticed there were still problems with it. The right side mirror pivot arm had come loose and the mirror was wedged all cattywompus. This also had the film advance and shutter jammed. With some careful disassembly and reassembly I was able to restore functionality without even scratching the mirror. After I was finished, the only thing that doesn't function is?? Yep you guessed it, the meter. This camera has an aperture priority mode and when selected the meter tells the shutter to fire at a 2 second rate no matter what the light conditions are. Not an issue for me though. This little guy has a nice Rokkor 45mm f2 lens that is spotless, it also has shutter speeds up to 1/1000th, ASA range of 50 to 1600 with plus/minus 2 EV, 1/60th flash sync on the hot shoe, self timer, and a cable release. Below is my favorite photograph from the test roll that I put through this nice 35mm camera.


The film I used for this photograph was Efke KB100 that expired 03/09. I really like this film and this photograph is a good example of why I like it. I bought it on a 100' roll to make up 35mm cassettes and after sitting in a temp controlled environment it still performs with no loss of speed after two years.
The developer I used was D-76 1+1. This film developed in D-76 is capable of competing with the more expensive films that are still available. When exposed properly, this film/developer combination will yield remarkable sharpness and with nice tonal graduation. This is a nice combination to shoot using the Zone System with predictable results. The other developer that I really like this film in is Rodinal 1+100 stand process for 60 minutes. As Rodinal is an acutance developer the grain will be more pronounced but it will extend the tonal graduation.

Minolta XG1 ƒ16 1/250th
Expired (03/09) Efke KB100
D-76 1+1 9:30min 20º C

Yashica TL Electro X & Fomapan T200


One good Yashica deserves another. After picking up my Yashica TL, I started searching for a black version of their 35mm cameras -my favorite color scheme.


This one is in EX- condition. Typical of cameras this old the only thing that doesn't work is the meter. Whereas the meter in my Yashica TL is completely dead, this meter will wiggle a tad if pointed into bright light, but that's about it.


The TL Electro X has more robust features than the strait TL model. It has a 50mm f1.7 lens which is crisp and clear of any abnormalities. The shutter speed max is 1/1000th, there is a mirror lockup, cable release, flash sync on the hot shoe and PC port. The maximum ISO is still 800 like the TL.

Just as with the TL, this one feels very right in the hands. It's a nice solid camera that can be depended on. Below is a photograph taken on the first roll of film I put through this beauty. The photograph itself is I think a little less than what this camera can do, but that is only because the film was developed in Caffenol C-L. In fairness to Caffenol, I am still building a curve for this developer. More on Caffenol later.


The film I used for this photograph was Fomapan T200 35mm. This is another film that I scooped up several 100' rolls of. This emulsion is much different than Foma's 100 and 400 speed films. The crystal formations are very unique and give this film a lot of latitude in exposure, and this is why I chose it for my second Caffenol experiment. I will up front concede that I am still learning how to formulate my Caffenol to match the films and speeds that I use. This particular photograph was exposed at EI400, a one stop push. The tones rendered were nice, but I will need to work on sharpness. This film is capable of being incredibly sharp in commercial developers, so I believe the lack of sharpness has everything to do with my particular Caffenol formula used with this film. The formulation I used is below.

Yashica TL Electro X
Fomapan T200 @ EI400
Caffenol C-L
500ml distilled water
30g Sodium Carbonate
8g Ascorbic Acid
500mg Potassium Bromide
20g Folgers instant coffee

15 minute dev time at 21c
Standard agitation schedule


Yashica TL & Fomapan 100


I knew about Yashica's 35mm cameras for quite a while, but never owned one. I do have three Yashica TLR's, and really enjoy them. I came upon this nice Yashica TL 35mm via Auntie M the auction ninja. The camera was in EX+ condition so I popped the $20 for it, and I sure am pleased with it. The lens is a 50mm f2 and it's flawless. The only flaw on the whole camera is that the onboard meter is DOA. As a rule I rely on the Sunny 16 rule of reciprocity rather than trust an average metering system, so no worries this one is kaput.

The camera has a fast 1/500th max shutter speed, a cable release, self timer, 1/60th flash sync on the hot shoe and through a PC port. The only strange thing is the ISO range stops at 800. I suppose this was due to the limitations of the metering system. Overall the camera is very solid and feels perfect in the hands. The mechanisms are precise and accurate. In short? I really love this one.

Below is my favorite photograph taken on the first roll I put through it. Very crisp and delightful.


The film I used for this photograph was Fomapan 100. I really like this film as it is very predictable and results are easily duplicated. The lighting was very flat when I shot this roll, and as a result I went to Rodinal to extend the tonal range as much as I could. Like clockwork it gave me wonderful tones. This film is very easy to use provided it isn't overexposed.


Yashica TL 35mm
Fomapan 100
Rodinal 1+50 8min 20c